Entry 012
Diagnosing and Correcting Paint Flashing
Uneven sheen, visible repairs, and cut-in bands: three SPATE-led approaches to a consistent finish.
Troubleshoot flashing, uneven paint, and a blotchy finish on painted vinyl siding and interior walls. Learn to level repairs, match texture, correct cut-in bands, repaint corner to corner, and inspect the dried result.
My standard
Identify the surface and coating, determine whether the defect is physical or visual, and correct the cause before repainting.
My standard: Match the repaired surface to its surroundings, then coat the whole wall from corner to corner. Judge the result after it dries, from different angles and under changing light.
1. Start with the SPATE checks
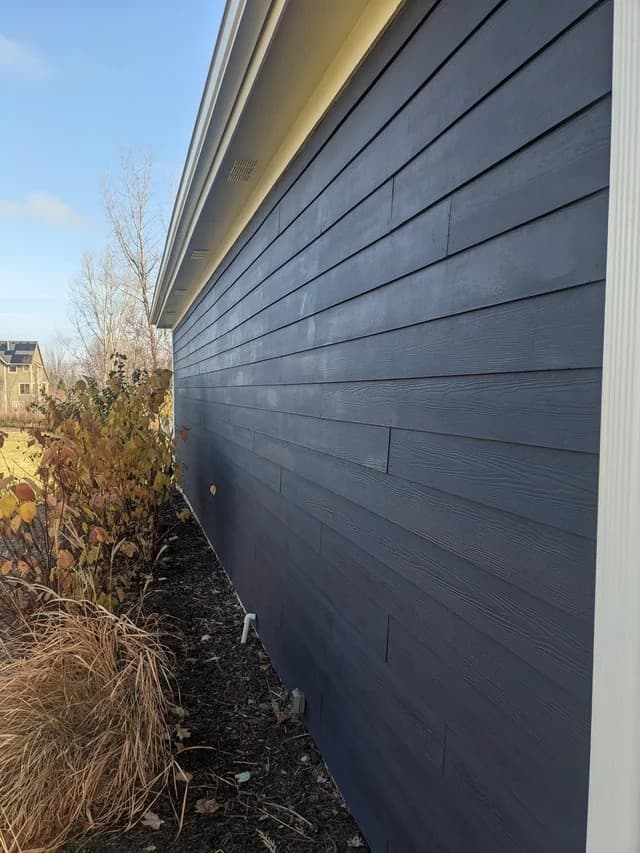
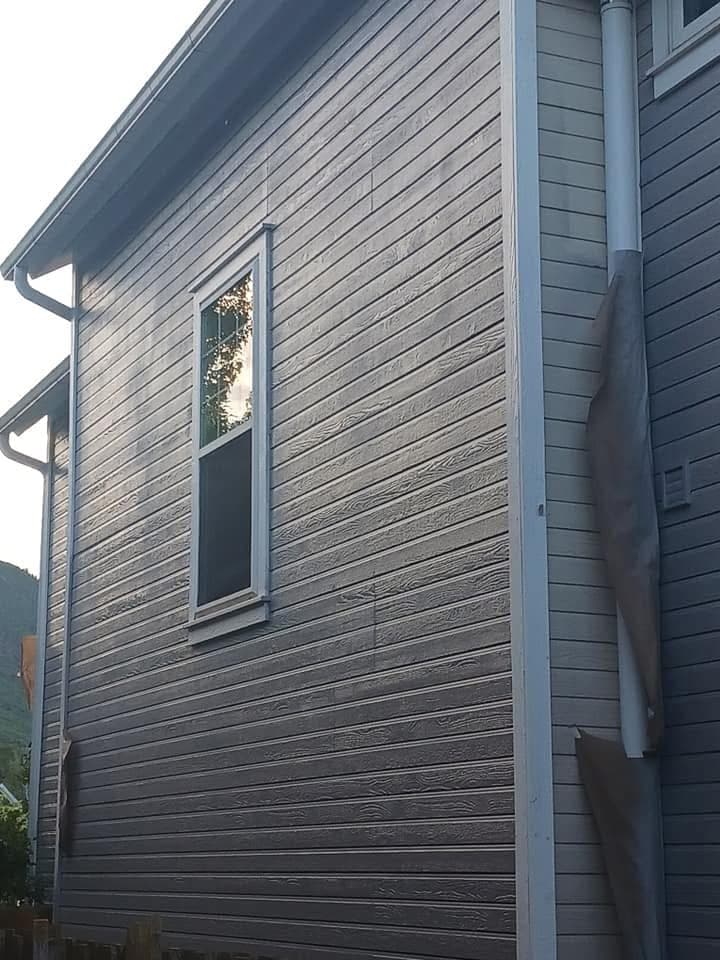
Flashing is an uneven appearance in the sheen of a painted surface. People looking for a solution may describe what they see as "uneven paint," a "blotchy finish," "streaks," or "lines." Those descriptions help identify the concern, but they are not all definitions of flashing. A patch may look dull, a band may look shinier, or the difference may become obvious only when viewed at an angle. A visible color difference or a raised application line can also resemble flashing; check both color and reflection, and feel for physical ridges, before deciding on the correction.
| SPATE check | What to establish |
|---|---|
| S / Substrate | Material, existing finish, texture, soundness, and any repaired areas. |
| P / Product | Paint type, color, sheen, compatibility, and the selected product's application limits. |
| A / Application | How paint will be distributed evenly while maintaining a wet edge. |
| T / Tools | Suitable abrasives, inspection light, roller cover, and spray equipment if used. |
| E / Execution | Preparation sequence, conditions, drying, and inspection at each step. |
Uneven sheen can have several causes. Inspect the surface before deciding how to correct it.
These examples concern appearance defects on otherwise sound surfaces. If inspection finds peeling, loss of adhesion, water damage, or another failing condition, address that problem before applying these corrective coats. See Repainting Previously Painted Interior Walls and Choosing the Right Primer.
2. Vinyl siding: identify the finish and prepare the wall
My usual preference on this surface is a good exterior acrylic in satin for washability. If the owner likes the existing color, I arrange a match. Leftover original paint and its label help. When possible, I return to the same store that supplied it because tinting can vary between locations. That improves our starting point; it does not guarantee an exact match.
If the sound coating has flashing alone, cleaning may be all the preparation needed. If there are raised spray lines as well, those lines need attention so the next coat goes over an even surface.
Work on the raised coating, without cutting into or flattening the siding's own texture. Test a small area and check that the chosen finish will hide the sanding pattern. Remove sanding residue before coating. If preparation exposes a different underlying surface, reassess its preparation and primer requirements instead of treating it as the original sound paint.
The two photographs accompanying this example were supplied as examples of flashing on vinyl siding. They show the appearance defect, not a completed correction or a proven application cause.
3. Vinyl siding: apply one consistent corrective coat
This nap choice belongs to this siding example. Select the cover for the actual texture and desired finish; the shared reference is Selecting Brushes and Roller Covers. Use Airless Spraying for masking, setup, tip selection, and application technique.
Keep the application consistent across the whole wall, maintaining the wet edge and working to natural breaks. If spraying and back-rolling, work the coating while it is still wet.
See Section 8 for the additive checks before using Floetrol.
4. Vinyl siding: inspect after drying and as the light changes
Before repeating the coat, reassess the cause: surface variation, application consistency, or conditions may still need correction. Inspect for holidays, raised lines, runs, and uneven sheen. Observe the coating's recoat interval; checking later in the day is a lighting check, not a prescribed drying schedule.
The photograph of the window wall shows why an angled inspection matters. Uneven reflection can stand out across and below the window even when the wall has overall color coverage.
5. Interior repairs: match the height and texture first
Match the surrounding finish as well as the height. A smooth patch in a textured wall will remain visually different even if its color is right. Refer to the repair and texture guidance in Repainting Previously Painted Interior Walls.
The sequence for that field method is:
- Level the repair and remove sanding dust.
- Prime the repaired background.
- Match the surrounding texture over the prepared, ready-to-recoat surface.
- Allow the texture material to dry as specified.
- Prime the new texture before the finish coats.
For primer selection, use Choosing the Right Primer. The primer must suit the surface it will actually contact.
6. Interior repairs: build the local finish, then repaint the wall
Observe the coating's drying and recoat requirements between local applications. Avoid building a new ridge at the patch perimeter. Matching the existing finish means achieving a consistent surface; it does not mean guessing how many historical coats are on the wall and copying that number.
Choose the interior roller cover from the shared brush and roller guide, matching the actual texture and finish. This corrective sequence does not change my new-drywall standard: primer followed by two finish coats, as described in Preparing and Painting New Drywall.
7. Cut-in bands: level raised brush marks and roll to the edges
A visible border around the wall can be picture framing or hatbanding. Establish whether it is only a color or sheen difference, or whether there are physical brush ridges to remove.
Remove the sanding dust and inspect by touch and from different angles. Once the surface is even, spot-prime the sanded areas with a compatible primer. Build the local finish to match the surrounding wall, using the repair sequence in Sections 5 and 6 where applicable.
I use my main roller right to the taped edge. A mini roller with the same nap length is an option, but it is not my routine choice. If a corner or adjacent surface prevents the main roller from reaching an area, I use the matching-nap mini roller there first. Then I follow with the main roller, from top to bottom, working across the wall while the paint remains workable.
The masking must protect the adjacent surface wherever the roller reaches the edge. Inspect the entire dried wall, including its perimeter; use the checks in Section 6 before calling the correction finished.
8. Floetrol and tape-edge sealing: separate practice from directions
The thin caulk seal at the tape edge
For the full crew sequence and the distinction between field practice and published directions, see Interior Painting Techniques and Guidelines for a Paint Crew.
9. Final inspection and completion
The correction is ready for handover when the dried finish is consistent across the complete wall and its edges, with no remaining flashing, holidays, pinholes, raised application marks, or obvious repair outline. Inspect at multiple angles; outdoors, repeat under changing daylight, and indoors, use a work light as well as the room's normal lighting.
When another coat is needed, correct any continuing cause first and respect the product's recoat requirements. A further full-wall coat can even the finish; it cannot substitute for leveling a poor repair or correcting an unsuitable application condition.
SPATE at a glance
- Substrate
- Identify the substrate, existing finish, soundness, texture, and repair height before diagnosing flashing.
- Product
- Choose a compatible finish and primer; check vinyl tint suitability, sheen, and any proposed paint additive.
- Application
- Level and match repairs, build the local finish, then apply an even full-wall coat with a maintained wet edge.
- Tools
- Select abrasives and a roller for the surface; use a work light, masking, and suitable spray equipment if spraying.
- Execution
- Inspect at each stage, observe product conditions and drying intervals, then judge the dried wall at multiple angles and in changing light.
Sources and references
- Sherwin-Williams. Uneven Gloss (Flashing). Checked October 1, 2026.
- Sherwin-Williams. How to Paint Vinyl Siding. Checked October 1, 2026.
- Sherwin-Williams. Exterior: Product Application Frequently Asked Questions. Checked September 30, 2026.
- Sherwin-Williams. Uneven Color (Picture Framing/Hatbanding). Checked September 30, 2026.
- PPG Architectural Finishes. FLOOD FLOETROL FLD6 technical data sheet, April 2016; manufacturer document hosted by Home Depot. Checked October 1, 2026. Confirm current labels for the products being used.
- Sherwin-Williams. 950A Siliconized Acrylic Latex Caulk product data sheet; reviewed copy includes March 2018 and November 2020 page dates. Checked October 1, 2026.
- 3M. Scotch Delicate Surface Painter's Tape 2080. Checked October 1, 2026.
- 3M. Proper Tape Removal. Checked October 1, 2026.
- U.S. Environmental Protection Agency. Lead-Safe Renovations for DIYers. Updated August 20, 2026; checked October 1, 2026.